
Zones let you divide your delivery area into territories and assign drivers or vehicles to each one, so routes are automatically built around the areas they cover. This guide covers how to turn zones on, create a zone group, and draw your zones on the map.
Step 1: Turn on Zones
- Click Settings in the top right corner.
- Toggle Zones (Geographical) to ON.
- Click Save.
Step 2: Create a zone group
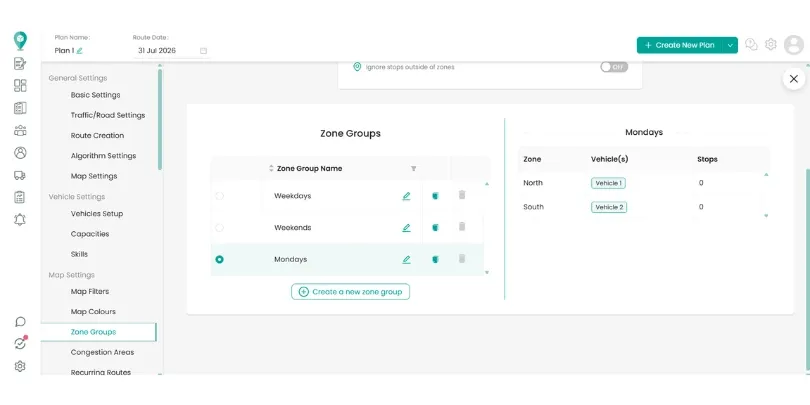
Zone groups let you switch between different sets of zones depending on the day or delivery pattern, for example North and South zones on weekdays, East and West on weekends.
- In Settings, click Zone Groups.
- Click the plus (+) icon and select Create a New Zone Group.
- Name your zone group.
You can create as many zone groups as you need, and check which zones belong to which group from this same Zone Groups menu at any time.
Step 3: Draw your zones
Once your zone group is created, you draw the actual zones against it from the map view (video below).
- Open a draft plan to bring up the map view.
- Select the zone group you want to draw zones for.
- Click the draw zone tool.
- Draw a polygon over the map to outline the area for your first zone.
- Once you've finished clicking to outline the shape, press Enter to complete it.
- You can name the zone and assign a vehicle to it.
- Repeat for each any additional zones you wish to add.
Each zone in the group can be assigned its own vehicle, so as you draw multiple zones, you're effectively splitting one delivery area into territories that are automatically covered by whichever vehicle is assigned to that zone.
Didn’t answer your question?
You can see our other guides here or contact support at support@smartroutes.io.
Please provide us with some additional feedback
Thanks for your feedback. It is greatly appreciated